
-
 Afrikaans
 -
 Albanian
 -
 Amharic
 -
 Arabic
 -
 Armenian
 -
 Azerbaijani
 -
 Basque
 -
 Belarusian
 -
 Bengali
 -
 Bosnian
 -
 Bulgarian
 -
 Catalan
 -
 Cebuano
 -
 Corsican
 -
 Croatian
 -
 Czech
Czech -
 Danish
 -
 Dutch
Dutch -
 English
 -
 Esperanto
 -
 Estonian
 -
 Finnish
 -
 French
 -
 Frisian
 -
 Galician
 -
 Georgian
 -
 German
 -
 Greek
Greek -
 Gujarati
 -
 Haitian Creole
 -
 hausa
hausa -
 hawaiian
 -
 Hebrew
 -
 Hindi
Hindi -
 Miao
Miao -
 Hungarian
 -
 Icelandic
 -
 igbo
igbo -
 Indonesian
 -
 irish
irish -
 Italian
 -
 Japanese
 -
 Javanese
 -
 Kannada
 -
 kazakh
 -
 Khmer
Khmer -
 Rwandese
 -
 Korean
 -
 Kurdish
 -
 Kyrgyz
 -
 Lao
Lao -
 Latin
Latin -
 Latvian
 -
 Lithuanian
 -
 Luxembourgish
 -
 Macedonian
 -
 Malgashi
 -
 Malay
Malay -
 Malayalam
 -
 Maltese
 -
 Maori
Maori -
 Marathi
 -
 Mongolian
 -
 Myanmar
 -
 Nepali
 -
 Norwegian
 -
 Norwegian
 -
 Occitan
 -
 Pashto
 -
 Persian
 -
 Polish
 -
 Portuguese
 -
 Punjabi
 -
 Romanian
 -
 Russian
 -
 Samoan
 -
 Scottish Gaelic
 -
 Serbian
 -
 Sesotho
 -
 Shona
Shona -
 Sindhi
 -
 Sinhala
 -
 Slovak
 -
 Slovenian
 -
 Somali
 -
 Spanish
 -
 Sundanese
 -
 Swahili
 -
 Swedish
 -
 Tagalog
 -
 Tajik
Tajik -
 Tamil
Tamil -
 Tatar
Tatar -
 Telugu
 -
 Thai
Thai -
 Turkish
 -
 Turkmen
 -
 Ukrainian
 -
 Urdu
Urdu -
 Uighur
 -
 Uzbek
Uzbek -
 Vietnamese
 -
 Welsh
Welsh -
 Bantu
Bantu -
 Yiddish
 -
 Yoruba
 -
 Zulu
Zulu


Th2 . 20, 2025 05:36
Back to list
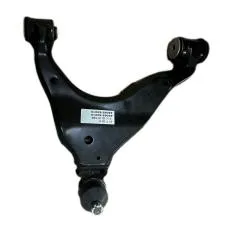
front driver side lower control arm
Replacing the lower control arm in your vehicle is a task that requires a blend of mechanical skill, precision, and understanding of the components involved. This essential suspension component plays a critical role in maintaining vehicle stability, steering control, and overall safety. For anyone venturing into this automotive challenge, knowledge and preparation are not just assets—they're necessities.
The extracted control arm usually reveals signs of wear, such as cracks or bushing deterioration, validating your decision to replace it. As you prepare to install the new component, compare both the old and new arms to ensure compatibility. This simple step averts potential misfits that could lead to alignment issues or mechanical failure. Installing the new lower control arm involves reversing the removal process. Secure the arm to the frame first, aligning the bushings and fasten the bolts loosely to permit slight adjustments. Attach the control arm to the wheel assembly, ensuring stable alignment before tightening all bolts to the manufacturer’s torque specifications. Consistent torque ensures that the arm remains secure but not overtightened, which could impede movement and compromise function. With the new lower control arm installed, examine related suspension components. Check for wear or damage to tie rods, ball joints, and sway bar links, as these elements work in concert with the control arm. Consider professional alignment services post-replacement to guarantee wheel alignment precision, reducing tire wear and enhancing road handling. Vehicle assessment post-installation should focus on improved performance listen for noise reduction, perceive better steering response, and inspect tire wear patterns over time. Engaging a test drive on varied road conditions confirms that the installation is successful and the vehicle safety is uncompromised. This replacement task, while daunting, is manageable with attentive practice and comprehension. Gathering real-world knowledge, consulting with automotive experts, and leveraging thorough documentation enhances your proficiency, instilling confidence and safety. Ultimately, replacing the lower control arm not only rejuvenates your vehicle’s handling but reinforces its foundational integrity, offering a safer, smoother driving experience.

The extracted control arm usually reveals signs of wear, such as cracks or bushing deterioration, validating your decision to replace it. As you prepare to install the new component, compare both the old and new arms to ensure compatibility. This simple step averts potential misfits that could lead to alignment issues or mechanical failure. Installing the new lower control arm involves reversing the removal process. Secure the arm to the frame first, aligning the bushings and fasten the bolts loosely to permit slight adjustments. Attach the control arm to the wheel assembly, ensuring stable alignment before tightening all bolts to the manufacturer’s torque specifications. Consistent torque ensures that the arm remains secure but not overtightened, which could impede movement and compromise function. With the new lower control arm installed, examine related suspension components. Check for wear or damage to tie rods, ball joints, and sway bar links, as these elements work in concert with the control arm. Consider professional alignment services post-replacement to guarantee wheel alignment precision, reducing tire wear and enhancing road handling. Vehicle assessment post-installation should focus on improved performance listen for noise reduction, perceive better steering response, and inspect tire wear patterns over time. Engaging a test drive on varied road conditions confirms that the installation is successful and the vehicle safety is uncompromised. This replacement task, while daunting, is manageable with attentive practice and comprehension. Gathering real-world knowledge, consulting with automotive experts, and leveraging thorough documentation enhances your proficiency, instilling confidence and safety. Ultimately, replacing the lower control arm not only rejuvenates your vehicle’s handling but reinforces its foundational integrity, offering a safer, smoother driving experience.
Latest news
Unbeatable Control Arm Wholesale Deals Varieties
NewsJul.25,2025
Trusted Front Lower Control Arm Manufacturing Solutions
NewsJul.25,2025
Superior Car Control Arms for Advanced Auto Parts
NewsJul.25,2025
Mastering Car Performance with Supreme Front Control Arms
NewsJul.25,2025
Extended Control Arms: Revolutionizing Suspension Performance
NewsJul.25,2025
Control Arm Advance Auto Parts: Essential Components for Vehicle Performance
NewsJul.25,2025
-

 English
 Afrikaans
 Albanian
 Amharic
 Arabic
 Armenian
 Azerbaijani
 Basque
 Belarusian
 Bengali
 Bosnian
 Bulgarian
 Catalan
 Cebuano
 Corsican
 Croatian
 Czech
Czech
 Danish
 Dutch
Dutch
 Esperanto
 Estonian
 Finnish
 French
 Frisian
 Galician
 Georgian
 German
 Greek
Greek
 Gujarati
 Haitian Creole
 Hausa
Hausa
 Hawaiian
 Hebrew
 Hindi
Hindi
 Miao
Miao
 Hungarian
 Icelandic
 Igbo
Igbo
 Indonesian
 Irish
Irish
 Italian
 Japanese
 Javanese
 Kannada
 Kazakh
 Khmer
Khmer
 Rwandese
 Korean
 Kurdish
 Kyrgyz
 Lao
Lao
 Latin
Latin
 Latvian
 Lithuanian
 Luxembourgish
 Macedonian
 Malgashi
 Malay
Malay
 Malayalam
 Maltese
 Maori
Maori
 Marathi
 Mongolian
 Myanmar
 Nepali
 Norwegian
 Norwegian
 Occitan
 Pashto
 Persian
 Polish
 Portuguese
 Punjabi
 Romanian
 Russian
 Samoan
 Scottish Gaelic
 Serbian
 Sesotho
 Shona
Shona
 Sindhi
 Sinhala
 Slovak
 Slovenian
 Somali
 Spanish
 Sundanese
 Swahili
 Swedish
 Tagalog
 Tajik
Tajik
 Tamil
Tamil
 Tatar
Tatar
 Telugu
 Thai
Thai
 Turkish
 Turkmen
 Ukrainian
 Urdu
Urdu
 Uighur
 Uzbek
Uzbek
 Welsh
Welsh
 Bantu
Bantu
 Yiddish
 Yoruba
 Zulu
Zulu
 Vietnamese


