
-
 Afrikaans
 -
 Albanian
 -
 Amharic
 -
 Arabic
 -
 Armenian
 -
 Azerbaijani
 -
 Basque
 -
 Belarusian
 -
 Bengali
 -
 Bosnian
 -
 Bulgarian
 -
 Catalan
 -
 Cebuano
 -
 Corsican
 -
 Croatian
 -
 Czech
Czech -
 Danish
 -
 Dutch
Dutch -
 English
 -
 Esperanto
 -
 Estonian
 -
 Finnish
 -
 French
 -
 Frisian
 -
 Galician
 -
 Georgian
 -
 German
 -
 Greek
Greek -
 Gujarati
 -
 Haitian Creole
 -
 hausa
hausa -
 hawaiian
 -
 Hebrew
 -
 Hindi
Hindi -
 Miao
Miao -
 Hungarian
 -
 Icelandic
 -
 igbo
igbo -
 Indonesian
 -
 irish
irish -
 Italian
 -
 Japanese
 -
 Javanese
 -
 Kannada
 -
 kazakh
 -
 Khmer
Khmer -
 Rwandese
 -
 Korean
 -
 Kurdish
 -
 Kyrgyz
 -
 Lao
Lao -
 Latin
Latin -
 Latvian
 -
 Lithuanian
 -
 Luxembourgish
 -
 Macedonian
 -
 Malgashi
 -
 Malay
Malay -
 Malayalam
 -
 Maltese
 -
 Maori
Maori -
 Marathi
 -
 Mongolian
 -
 Myanmar
 -
 Nepali
 -
 Norwegian
 -
 Norwegian
 -
 Occitan
 -
 Pashto
 -
 Persian
 -
 Polish
 -
 Portuguese
 -
 Punjabi
 -
 Romanian
 -
 Russian
 -
 Samoan
 -
 Scottish Gaelic
 -
 Serbian
 -
 Sesotho
 -
 Shona
Shona -
 Sindhi
 -
 Sinhala
 -
 Slovak
 -
 Slovenian
 -
 Somali
 -
 Spanish
 -
 Sundanese
 -
 Swahili
 -
 Swedish
 -
 Tagalog
 -
 Tajik
Tajik -
 Tamil
Tamil -
 Tatar
Tatar -
 Telugu
 -
 Thai
Thai -
 Turkish
 -
 Turkmen
 -
 Ukrainian
 -
 Urdu
Urdu -
 Uighur
 -
 Uzbek
Uzbek -
 Vietnamese
 -
 Welsh
Welsh -
 Bantu
Bantu -
 Yiddish
 -
 Yoruba
 -
 Zulu
Zulu


Feb . 20, 2025 03:30
Back to list
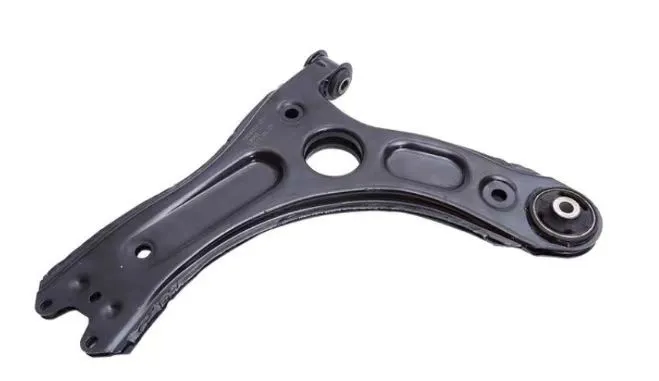
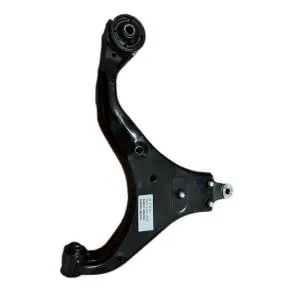
changing lower control arm
Changing a lower control arm is one of those maintenance tasks that may intimidate the average car owner. Sure, it’s not as simple as changing the oil, but with the right tools and a little patience, it's a task that can be tackled at home. Delve into this hands-on guide to understand the nuances of this process, ensuring efficiency, safety, and longevity of your vehicle.
The new control arm installation essentially reverses the removal process, yet it demands precision, especially when dealing with torque specifications. Under or over-tightening can result in premature wear, unsafe driving conditions, or component failure. Consult the vehicle’s service manual to apply proper torque ratios to bolts, assuring a solid, reliable fit. Many professional mechanics recommend an alignment check following the installation of a new control arm. The alteration in suspension can subtly shift vehicle alignment, potentially causing uneven tire wear or imprecise steering. A fresh alignment restores the correct handling and prolongs tire life. Be sure to inspect and verify each connection and accessed component before securing the wheel and lowering the vehicle. By completing this process thoughtfully, you enhance the car’s performance and reliability, ensuring each drive remains as safe and comfortable as intended. Beyond the hands-on process, consider the quality and brand reputation when acquiring a replacement lower control arm. Opting for trusted manufacturers often equates to superior materials, longer life spans, and greater resilience under broad driving conditions. In the realm of DIY auto repairs, changing a lower control arm is a task that strikes a balance between complexity and achievability. By wisely preparing, following meticulous steps, and respecting the machinery, even an enthusiastic amateur can transform this daunting challenge into a feasible endeavor. Embracing this experience not only enhances one's mechanical aptitude but also cultivates a deeper appreciation for the intricacies of automotive engineering.
The new control arm installation essentially reverses the removal process, yet it demands precision, especially when dealing with torque specifications. Under or over-tightening can result in premature wear, unsafe driving conditions, or component failure. Consult the vehicle’s service manual to apply proper torque ratios to bolts, assuring a solid, reliable fit. Many professional mechanics recommend an alignment check following the installation of a new control arm. The alteration in suspension can subtly shift vehicle alignment, potentially causing uneven tire wear or imprecise steering. A fresh alignment restores the correct handling and prolongs tire life. Be sure to inspect and verify each connection and accessed component before securing the wheel and lowering the vehicle. By completing this process thoughtfully, you enhance the car’s performance and reliability, ensuring each drive remains as safe and comfortable as intended. Beyond the hands-on process, consider the quality and brand reputation when acquiring a replacement lower control arm. Opting for trusted manufacturers often equates to superior materials, longer life spans, and greater resilience under broad driving conditions. In the realm of DIY auto repairs, changing a lower control arm is a task that strikes a balance between complexity and achievability. By wisely preparing, following meticulous steps, and respecting the machinery, even an enthusiastic amateur can transform this daunting challenge into a feasible endeavor. Embracing this experience not only enhances one's mechanical aptitude but also cultivates a deeper appreciation for the intricacies of automotive engineering.
Latest news
Unbeatable Control Arm Wholesale Deals Varieties
NewsJul.25,2025
Trusted Front Lower Control Arm Manufacturing Solutions
NewsJul.25,2025
Superior Car Control Arms for Advanced Auto Parts
NewsJul.25,2025
Mastering Car Performance with Supreme Front Control Arms
NewsJul.25,2025
Extended Control Arms: Revolutionizing Suspension Performance
NewsJul.25,2025
Control Arm Advance Auto Parts: Essential Components for Vehicle Performance
NewsJul.25,2025
-

 English
 Afrikaans
 Albanian
 Amharic
 Arabic
 Armenian
 Azerbaijani
 Basque
 Belarusian
 Bengali
 Bosnian
 Bulgarian
 Catalan
 Cebuano
 Corsican
 Croatian
 Czech
Czech
 Danish
 Dutch
Dutch
 Esperanto
 Estonian
 Finnish
 French
 Frisian
 Galician
 Georgian
 German
 Greek
Greek
 Gujarati
 Haitian Creole
 Hausa
Hausa
 Hawaiian
 Hebrew
 Hindi
Hindi
 Miao
Miao
 Hungarian
 Icelandic
 Igbo
Igbo
 Indonesian
 Irish
Irish
 Italian
 Japanese
 Javanese
 Kannada
 Kazakh
 Khmer
Khmer
 Rwandese
 Korean
 Kurdish
 Kyrgyz
 Lao
Lao
 Latin
Latin
 Latvian
 Lithuanian
 Luxembourgish
 Macedonian
 Malgashi
 Malay
Malay
 Malayalam
 Maltese
 Maori
Maori
 Marathi
 Mongolian
 Myanmar
 Nepali
 Norwegian
 Norwegian
 Occitan
 Pashto
 Persian
 Polish
 Portuguese
 Punjabi
 Romanian
 Russian
 Samoan
 Scottish Gaelic
 Serbian
 Shona
Shona
 Sindhi
 Sinhala
 Slovak
 Slovenian
 Somali
 Spanish
 Sundanese
 Swahili
 Swedish
 Tagalog
 Tajik
Tajik
 Tamil
Tamil
 Tatar
Tatar
 Telugu
 Thai
Thai
 Turkish
 Turkmen
 Ukrainian
 Urdu
Urdu
 Uighur
 Uzbek
Uzbek
 Vietnamese
 Welsh
Welsh
 Bantu
Bantu
 Yiddish
 Yoruba
 Zulu
Zulu
 Sesotho


