-
 Afrikaans
 -
 Albanian
 -
 Amharic
 -
 Arabic
 -
 Armenian
 -
 Azerbaijani
 -
 Basque
 -
 Belarusian
 -
 Bengali
 -
 Bosnian
 -
 Bulgarian
 -
 Catalan
 -
 Cebuano
 -
 Corsican
 -
 Croatian
 -
 Czech
Czech -
 Danish
 -
 Dutch
Dutch -
 English
 -
 Esperanto
 -
 Estonian
 -
 Finnish
 -
 French
 -
 Frisian
 -
 Galician
 -
 Georgian
 -
 German
 -
 Greek
Greek -
 Gujarati
 -
 Haitian Creole
 -
 hausa
hausa -
 hawaiian
 -
 Hebrew
 -
 Hindi
Hindi -
 Miao
Miao -
 Hungarian
 -
 Icelandic
 -
 igbo
igbo -
 Indonesian
 -
 irish
irish -
 Italian
 -
 Japanese
 -
 Javanese
 -
 Kannada
 -
 kazakh
 -
 Khmer
Khmer -
 Rwandese
 -
 Korean
 -
 Kurdish
 -
 Kyrgyz
 -
 Lao
Lao -
 Latin
Latin -
 Latvian
 -
 Lithuanian
 -
 Luxembourgish
 -
 Macedonian
 -
 Malgashi
 -
 Malay
Malay -
 Malayalam
 -
 Maltese
 -
 Maori
Maori -
 Marathi
 -
 Mongolian
 -
 Myanmar
 -
 Nepali
 -
 Norwegian
 -
 Norwegian
 -
 Occitan
 -
 Pashto
 -
 Persian
 -
 Polish
 -
 Portuguese
 -
 Punjabi
 -
 Romanian
 -
 Russian
 -
 Samoan
 -
 Scottish Gaelic
 -
 Serbian
 -
 Sesotho
 -
 Shona
Shona -
 Sindhi
 -
 Sinhala
 -
 Slovak
 -
 Slovenian
 -
 Somali
 -
 Spanish
 -
 Sundanese
 -
 Swahili
 -
 Swedish
 -
 Tagalog
 -
 Tajik
Tajik -
 Tamil
Tamil -
 Tatar
Tatar -
 Telugu
 -
 Thai
Thai -
 Turkish
 -
 Turkmen
 -
 Ukrainian
 -
 Urdu
Urdu -
 Uighur
 -
 Uzbek
Uzbek -
 Vietnamese
 -
 Welsh
Welsh -
 Bantu
Bantu -
 Yiddish
 -
 Yoruba
 -
 Zulu
Zulu
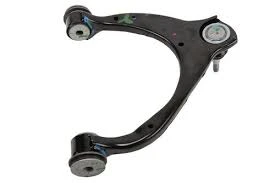
replacing upper control arm
Replacing the Upper Control Arm A Comprehensive Guide
The upper control arm plays a crucial role in a vehicle's suspension system, connecting the chassis to the wheel assembly. It helps in maintaining proper wheel alignment and contributes to the overall handling characteristics of the vehicle. Over time, wear and tear, road conditions, and driving habits can result in the degradation of the upper control arm, leading to potential handling issues, uneven tire wear, and an uncomfortable ride. Fortunately, replacing the upper control arm can restore your vehicle's performance and ensure safety.
Signs That Indicate Replacement is Needed
Before you embark on the replacement process, it's essential to recognize the signs that your upper control arm may need replacing. Common symptoms include clunking noises from the front suspension, uneven tire wear, a loose steering wheel, and the vehicle pulling to one side while driving. If you notice any of these signs, it’s advisable to inspect your upper control arm.
Tools and Materials Required
Replacing an upper control arm typically requires some essential tools including a socket set, wrenches, a ball joint separator, and possibly a torque wrench. Additionally, having a replacement control arm that is compatible with your vehicle model is crucial.
The Replacement Process
1. Safety First Begin by ensuring your vehicle is parked on a flat surface. Engage the parking brake and use wheel chocks to prevent any movement.
replacing upper control arm

2. Raise the Vehicle Loosen the wheel lugs and raise the vehicle using a jack. Secure it with jack stands for added safety.
3. Remove the Wheel Take off the wheel to access the suspension components.
4. Detach the Old Control Arm Remove any bolts or nuts securing the upper control arm to the chassis and the ball joint. This may require the use of a ball joint separator.
5. Install the New Control Arm Position the new control arm in place and attach it to the chassis and ball joint using the provided hardware. Ensure to follow the manufacturer’s torque specifications.
6. Reassemble Replace the wheel and lower the vehicle. Tighten the lug nuts in a crisscross pattern for even distribution.
7. Alignment Check After replacing the upper control arm, it’s highly recommended to have your vehicle’s alignment checked by a professional.
In conclusion, while replacing the upper control arm might seem daunting, with the right tools and some mechanical knowledge, it can be a manageable task. Ensuring your vehicle's suspension system is in good condition is vital for safe and comfortable driving. Whether you choose to do it yourself or consult a professional, timely replacement can make a significant difference in your vehicle's performance.
-

 Afrikaans
 Albanian
 Amharic
 Arabic
 Armenian
 Azerbaijani
 Basque
 Belarusian
 Bengali
 Bosnian
 Bulgarian
 Catalan
 Cebuano
 Corsican
 Croatian
 Czech
Czech
 Danish
 Dutch
Dutch
 Esperanto
 Estonian
 Finnish
 French
 Frisian
 Galician
 Georgian
 German
 Greek
Greek
 Gujarati
 Haitian Creole
 Hausa
Hausa
 Hawaiian
 Hebrew
 Hindi
Hindi
 Miao
Miao
 Hungarian
 Icelandic
 Igbo
Igbo
 Indonesian
 Irish
Irish
 Italian
 Japanese
 Javanese
 Kannada
 Kazakh
 Khmer
Khmer
 Rwandese
 Korean
 Kurdish
 Kyrgyz
 Lao
Lao
 Latin
Latin
 Latvian
 Lithuanian
 Luxembourgish
 Macedonian
 Malgashi
 Malay
Malay
 Malayalam
 Maltese
 Maori
Maori
 Marathi
 Mongolian
 Myanmar
 Nepali
 Norwegian
 Norwegian
 Occitan
 Pashto
 Persian
 Polish
 Portuguese
 Punjabi
 Romanian
 Russian
 Samoan
 Scottish Gaelic
 Serbian
 Sesotho
 Shona
Shona
 Sindhi
 Sinhala
 Slovak
 Slovenian
 Somali
 Spanish
 Sundanese
 Swahili
 Swedish
 Tagalog
 Tajik
Tajik
 Tamil
Tamil
 Tatar
Tatar
 Telugu
 Thai
Thai
 Turkish
 Turkmen
 Ukrainian
 Urdu
Urdu
 Uighur
 Uzbek
Uzbek
 Vietnamese
 Welsh
Welsh
 Bantu
Bantu
 Yiddish
 Yoruba
 Zulu
Zulu
 English


