-
 Afrikaans
 -
 Albanian
 -
 Amharic
 -
 Arabic
 -
 Armenian
 -
 Azerbaijani
 -
 Basque
 -
 Belarusian
 -
 Bengali
 -
 Bosnian
 -
 Bulgarian
 -
 Catalan
 -
 Cebuano
 -
 Corsican
 -
 Croatian
 -
 Czech
Czech -
 Danish
 -
 Dutch
Dutch -
 English
 -
 Esperanto
 -
 Estonian
 -
 Finnish
 -
 French
 -
 Frisian
 -
 Galician
 -
 Georgian
 -
 German
 -
 Greek
Greek -
 Gujarati
 -
 Haitian Creole
 -
 hausa
hausa -
 hawaiian
 -
 Hebrew
 -
 Hindi
Hindi -
 Miao
Miao -
 Hungarian
 -
 Icelandic
 -
 igbo
igbo -
 Indonesian
 -
 irish
irish -
 Italian
 -
 Japanese
 -
 Javanese
 -
 Kannada
 -
 kazakh
 -
 Khmer
Khmer -
 Rwandese
 -
 Korean
 -
 Kurdish
 -
 Kyrgyz
 -
 Lao
Lao -
 Latin
Latin -
 Latvian
 -
 Lithuanian
 -
 Luxembourgish
 -
 Macedonian
 -
 Malgashi
 -
 Malay
Malay -
 Malayalam
 -
 Maltese
 -
 Maori
Maori -
 Marathi
 -
 Mongolian
 -
 Myanmar
 -
 Nepali
 -
 Norwegian
 -
 Norwegian
 -
 Occitan
 -
 Pashto
 -
 Persian
 -
 Polish
 -
 Portuguese
 -
 Punjabi
 -
 Romanian
 -
 Russian
 -
 Samoan
 -
 Scottish Gaelic
 -
 Serbian
 -
 Sesotho
 -
 Shona
Shona -
 Sindhi
 -
 Sinhala
 -
 Slovak
 -
 Slovenian
 -
 Somali
 -
 Spanish
 -
 Sundanese
 -
 Swahili
 -
 Swedish
 -
 Tagalog
 -
 Tajik
Tajik -
 Tamil
Tamil -
 Tatar
Tatar -
 Telugu
 -
 Thai
Thai -
 Turkish
 -
 Turkmen
 -
 Ukrainian
 -
 Urdu
Urdu -
 Uighur
 -
 Uzbek
Uzbek -
 Vietnamese
 -
 Welsh
Welsh -
 Bantu
Bantu -
 Yiddish
 -
 Yoruba
 -
 Zulu
Zulu
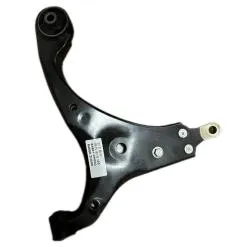
removing lower control arm
Removing a Lower Control Arm A Step-by-Step Guide
The lower control arm is a crucial component of a vehicle's suspension system, linking the chassis to the wheels. Over time, wear and tear may necessitate its removal, whether for replacement or maintenance. Here’s a guide to help you navigate this process.
Tools and Materials Needed Before you begin, gather the necessary tools a jack, jack stands, a wrench set, a socket set, pliers, and possibly a hammer. Having a repair manual specific to your vehicle model can also be invaluable.
Step 1 Safety First Always work in a well-ventilated area. Park the vehicle on a flat surface, engage the parking brake, and wear safety goggles and gloves.
Step 2 Raise the Vehicle Using a jack, lift the front or rear end of the vehicle based on which control arm you are removing. Once elevated, securely position jack stands beneath the vehicle to ensure stability.
Step 3 Remove the Wheel To access the control arm, you must first remove the corresponding wheel. Loosen the lug nuts with a wrench and take off the wheel.
removing lower control arm

Step 4 Disconnect the Control Arm Identify the bolts securing the lower control arm to the vehicle’s frame and the wheel hub assembly
. Use the appropriate sockets to remove these bolts, which may be rusted or tight, so don’t hesitate to use penetrating oil.Step 5 Inspect Adjacent Parts Before proceeding, inspect the surrounding components, such as the ball joints and bushings. If these parts show signs of damage, consider replacing them during this procedure.
Step 6 Remove the Control Arm Once all bolts are removed, gently wiggle the control arm to detach it from its mounting point. Depending on the vehicle, you might need to tap it lightly with a hammer to help loosen it.
Step 7 Installing the New Control Arm Position the new control arm in place, aligning it with the mounting points. Reinstall the bolts, ensuring they are torqued to the specifications outlined in your repair manual.
Step 8 Reassemble Reattach the wheel, lower the vehicle from the jack stands, and tighten the lug nuts securely.
Conclusion Removing a lower control arm may seem daunting, but with the right tools and precautions, it can be done effectively. Always refer to your vehicle’s manual for specific instructions and torque specifications, and if in doubt, consider consulting a professional mechanic for assistance.
-

 Afrikaans
 Albanian
 Amharic
 Arabic
 Armenian
 Azerbaijani
 Basque
 Belarusian
 Bengali
 Bosnian
 Bulgarian
 Catalan
 Cebuano
 Corsican
 Croatian
 Czech
Czech
 Danish
 Dutch
Dutch
 Esperanto
 Estonian
 Finnish
 French
 Frisian
 Galician
 Georgian
 German
 Greek
Greek
 Gujarati
 Haitian Creole
 Hausa
Hausa
 Hawaiian
 Hebrew
 Hindi
Hindi
 Miao
Miao
 Hungarian
 Icelandic
 Igbo
Igbo
 Indonesian
 Irish
Irish
 Italian
 Japanese
 Javanese
 Kannada
 Kazakh
 Khmer
Khmer
 Rwandese
 Korean
 Kurdish
 Kyrgyz
 Lao
Lao
 Latin
Latin
 Latvian
 Lithuanian
 Luxembourgish
 Macedonian
 Malgashi
 Malay
Malay
 Malayalam
 Maltese
 Maori
Maori
 Marathi
 Mongolian
 Myanmar
 Nepali
 Norwegian
 Norwegian
 Occitan
 Pashto
 Persian
 Polish
 Portuguese
 Punjabi
 Romanian
 Russian
 Samoan
 Scottish Gaelic
 Serbian
 Sesotho
 Shona
Shona
 Sindhi
 Sinhala
 Slovak
 Slovenian
 Somali
 Spanish
 Sundanese
 Swahili
 Swedish
 Tagalog
 Tajik
Tajik
 Tamil
Tamil
 Tatar
Tatar
 Telugu
 Thai
Thai
 Turkish
 Turkmen
 Ukrainian
 Urdu
Urdu
 Uighur
 Uzbek
Uzbek
 Vietnamese
 Welsh
Welsh
 Bantu
Bantu
 Yiddish
 Yoruba
 Zulu
Zulu
 English


