-
 Afrikaans
 -
 Albanian
 -
 Amharic
 -
 Arabic
 -
 Armenian
 -
 Azerbaijani
 -
 Basque
 -
 Belarusian
 -
 Bengali
 -
 Bosnian
 -
 Bulgarian
 -
 Catalan
 -
 Cebuano
 -
 Corsican
 -
 Croatian
 -
 Czech
Czech -
 Danish
 -
 Dutch
Dutch -
 English
 -
 Esperanto
 -
 Estonian
 -
 Finnish
 -
 French
 -
 Frisian
 -
 Galician
 -
 Georgian
 -
 German
 -
 Greek
Greek -
 Gujarati
 -
 Haitian Creole
 -
 hausa
hausa -
 hawaiian
 -
 Hebrew
 -
 Hindi
Hindi -
 Miao
Miao -
 Hungarian
 -
 Icelandic
 -
 igbo
igbo -
 Indonesian
 -
 irish
irish -
 Italian
 -
 Japanese
 -
 Javanese
 -
 Kannada
 -
 kazakh
 -
 Khmer
Khmer -
 Rwandese
 -
 Korean
 -
 Kurdish
 -
 Kyrgyz
 -
 Lao
Lao -
 Latin
Latin -
 Latvian
 -
 Lithuanian
 -
 Luxembourgish
 -
 Macedonian
 -
 Malgashi
 -
 Malay
Malay -
 Malayalam
 -
 Maltese
 -
 Maori
Maori -
 Marathi
 -
 Mongolian
 -
 Myanmar
 -
 Nepali
 -
 Norwegian
 -
 Norwegian
 -
 Occitan
 -
 Pashto
 -
 Persian
 -
 Polish
 -
 Portuguese
 -
 Punjabi
 -
 Romanian
 -
 Russian
 -
 Samoan
 -
 Scottish Gaelic
 -
 Serbian
 -
 Sesotho
 -
 Shona
Shona -
 Sindhi
 -
 Sinhala
 -
 Slovak
 -
 Slovenian
 -
 Somali
 -
 Spanish
 -
 Sundanese
 -
 Swahili
 -
 Swedish
 -
 Tagalog
 -
 Tajik
Tajik -
 Tamil
Tamil -
 Tatar
Tatar -
 Telugu
 -
 Thai
Thai -
 Turkish
 -
 Turkmen
 -
 Ukrainian
 -
 Urdu
Urdu -
 Uighur
 -
 Uzbek
Uzbek -
 Vietnamese
 -
 Welsh
Welsh -
 Bantu
Bantu -
 Yiddish
 -
 Yoruba
 -
 Zulu
Zulu
How to Replace a Control Arm (Upper or Lower)

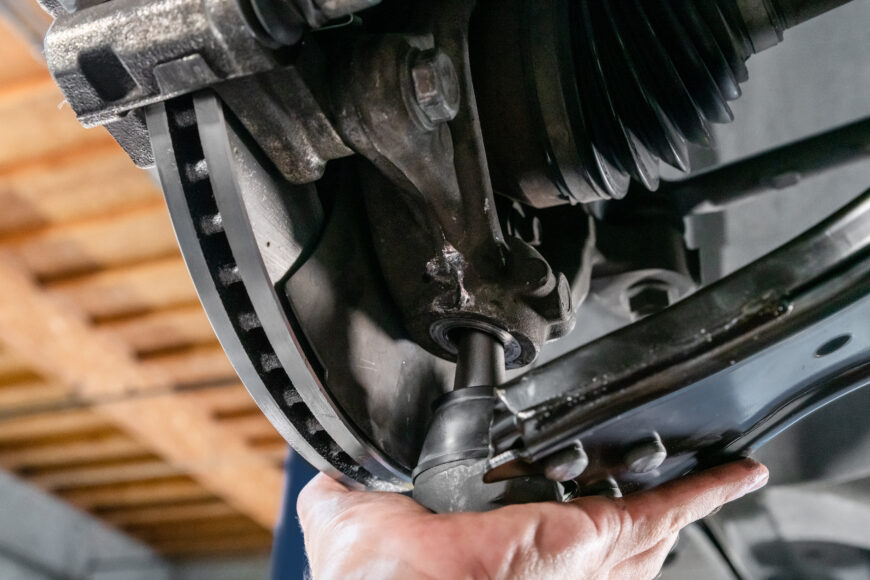
Control arms, otherwise knowns as A-arms, connect the wheel hub and steering knuckle to the vehicle’s frame or body. They allow the wheels to move up and down while maintaining the proper wheel alignment and keeping your vehicle stable. They pivot on each end – the mounts on the chassis side have a bushing that connects it, while the wheel side joins to the suspension with a ball joint.
Sturdy and long-lasting are characteristics of a control arm, but wear and tear or damage can occur. Sometimes control arm bushings or a ball joint can be replaced, but a complete control arm replacement is often simpler and still cost-effective. Whether you need an upper or lower control arm, most options range between $60 and $300 with $150 being the average.
Here, we’ll help you figure out if you have a bad control arm, how to replace it, and finally, how to confirm that the new part is good.
Identifying a Bad Control Arm
A bad control arm can affect the handling, stability, and overall safety of your vehicle. Identifying a bad control arm helps you address any issues and prevent further damage. Here are some common signs that indicate a failing control arm:
- Unusual noises – Clunking, creaking, or popping sounds coming from the suspension when going over bumps, turning, or braking may indicate worn or damaged control arm bushings or ball joints.
- Uneven tire wear – A bad control arm can cause poor wheel alignment, leading to uneven or accelerated tire wear, particularly on the inner or outer edges of the tires.
- Vibrations – If you feel vibrations in the steering wheel especially at higher speeds, it could be due to play that allows side-to-side motion at the wheel.
- Poor handling – A bad control arm can result in imprecise steering, excessive body roll during cornering, or a general feeling of instability while driving.
- Visible damage or wear – Inspect the control arm for visible signs of damage, such as cracks, bends, or corrosion. Check the bushings for excessive wear, cracking, or separation from the control arm. Look for worn or damaged ball joints, which may have torn rubber boots or visible rust.
- Excessive play – With the vehicle safely lifted and supported, grasp the wheel at the top and bottom and attempt to rock it back and forth. Excessive play could indicate a worn ball joint or bushing in the control arm.
If you find you have a bad control arm, changing it in a timely fashion can save hassle and money on additional repairs, plus it restores your vehicle’s handling and safety.
Preparing for Replacement
Whether it’s an upper or lower control arm you need to change, preparing to do the job requires the same precautions. Gather the tools you can foreseeably need such as a hydraulic jack and axle stand, a lug nut wrench, socket set, pliers, a breaker bar, a torque wrench, and a ball joint separator.
Your car needs to be parked on a flat, level surface with the parking brake engaged, and the wheel should be pointed straight ahead. Then, make your job easier later on by loosening – but not removing – the lug nuts. Then, lift your car and set it down on jack stands. Once it’s in the air, remove the wheel.
Replacing the Control Arm (Upper and Lower)
With your vehicle prepped and the wheels off, you can get started on replacing a lower or upper control arm.
1. Remove any obstructing components
Depending on your vehicle, you may need to remove additional components such as a sway bar, brake caliper, or other suspension parts to access the control arm. Consult your repair manual for specific instructions on removing these components if necessary.
2. Detach the ball joint
- Using a ball joint separator or pickle fork, carefully separate the ball joint from the steering knuckle. You may need to remove a cotter pin and castle nut before using the separator.
3. Remove the control arm bolts
Locate the bolts that attach the control arm to the vehicle’s frame or subframe. Use a socket wrench or breaker bar to remove these bolts. They may be seized, which might require penetrating oil, a hammer and punch, and some brute force to remove.
4. Remove the old control arm
Once the bolts are removed, gently pry the control arm away from the vehicle and remove it completely. Be careful not to damage any surrounding components during this process.
5. Inspect and clean the mounting points
Thoroughly inspect the mounting points on the vehicle for any signs of damage or excessive wear. Clean the area to remove any debris or rust.
6. Install the new control arm
Position the new control arm in place, insert the bolts, and hand-tighten them initially. Then, using a torque wrench, tighten the control arm bolts to the manufacturer’s specified torque setting.
7. Reattach the ball joint
Align the ball joint with the steering knuckle and insert it back into place. Secure it with the castle nut and cotter pin, if your car uses them. Torque the castle nut to the manufacturer’s specifications.
8. Reinstall any removed components
Reinstall any components that were removed earlier, such as the sway bar, brake caliper, or other suspension parts. Ensure all fasteners are tightened to their correct torque specifications.
Once a control arm is replaced, it’s recommended to get a wheel alignment performed, or at the very least, have a shop check that it’s still within spec.
Testing the New Control Arm
After your control arm replacement is complete you need to verify that your symptoms are gone. Check that there’s no longer play at the wheel when you shake it vertically, then take a test drive. Listen for rattling, clunking, or banging noises as you go over bumps, and feel for a vibration when you’re driving at higher speeds. If you still have symptoms, there may be additional steering or suspension parts that need to be replaced, or you may have a fastener like a control arm bolt that’s not quite tight.
-

 Afrikaans
 Albanian
 Amharic
 Arabic
 Armenian
 Azerbaijani
 Basque
 Belarusian
 Bengali
 Bosnian
 Bulgarian
 Catalan
 Cebuano
 Corsican
 Croatian
 Czech
Czech
 Danish
 Dutch
Dutch
 Esperanto
 Estonian
 Finnish
 French
 Frisian
 Galician
 Georgian
 German
 Greek
Greek
 Gujarati
 Haitian Creole
 Hausa
Hausa
 Hawaiian
 Hebrew
 Hindi
Hindi
 Miao
Miao
 Hungarian
 Icelandic
 Igbo
Igbo
 Indonesian
 Irish
Irish
 Italian
 Japanese
 Javanese
 Kannada
 Kazakh
 Khmer
Khmer
 Rwandese
 Korean
 Kurdish
 Kyrgyz
 Lao
Lao
 Latin
Latin
 Latvian
 Lithuanian
 Luxembourgish
 Macedonian
 Malgashi
 Malay
Malay
 Malayalam
 Maltese
 Maori
Maori
 Marathi
 Mongolian
 Myanmar
 Nepali
 Norwegian
 Norwegian
 Occitan
 Pashto
 Persian
 Polish
 Portuguese
 Punjabi
 Romanian
 Russian
 Samoan
 Scottish Gaelic
 Serbian
 Sesotho
 Shona
Shona
 Sindhi
 Sinhala
 Slovak
 Slovenian
 Somali
 Spanish
 Sundanese
 Swahili
 Swedish
 Tagalog
 Tajik
Tajik
 Tamil
Tamil
 Tatar
Tatar
 Telugu
 Thai
Thai
 Turkish
 Turkmen
 Ukrainian
 Urdu
Urdu
 Uighur
 Uzbek
Uzbek
 Vietnamese
 Welsh
Welsh
 Bantu
Bantu
 Yiddish
 Yoruba
 Zulu
Zulu
 English


