
-
 Afrikaans
 -
 Albanian
 -
 Amharic
 -
 Arabic
 -
 Armenian
 -
 Azerbaijani
 -
 Basque
 -
 Belarusian
 -
 Bengali
 -
 Bosnian
 -
 Bulgarian
 -
 Catalan
 -
 Cebuano
 -
 Corsican
 -
 Croatian
 -
 Czech
Czech -
 Danish
 -
 Dutch
Dutch -
 English
 -
 Esperanto
 -
 Estonian
 -
 Finnish
 -
 French
 -
 Frisian
 -
 Galician
 -
 Georgian
 -
 German
 -
 Greek
Greek -
 Gujarati
 -
 Haitian Creole
 -
 hausa
hausa -
 hawaiian
 -
 Hebrew
 -
 Hindi
Hindi -
 Miao
Miao -
 Hungarian
 -
 Icelandic
 -
 igbo
igbo -
 Indonesian
 -
 irish
irish -
 Italian
 -
 Japanese
 -
 Javanese
 -
 Kannada
 -
 kazakh
 -
 Khmer
Khmer -
 Rwandese
 -
 Korean
 -
 Kurdish
 -
 Kyrgyz
 -
 Lao
Lao -
 Latin
Latin -
 Latvian
 -
 Lithuanian
 -
 Luxembourgish
 -
 Macedonian
 -
 Malgashi
 -
 Malay
Malay -
 Malayalam
 -
 Maltese
 -
 Maori
Maori -
 Marathi
 -
 Mongolian
 -
 Myanmar
 -
 Nepali
 -
 Norwegian
 -
 Norwegian
 -
 Occitan
 -
 Pashto
 -
 Persian
 -
 Polish
 -
 Portuguese
 -
 Punjabi
 -
 Romanian
 -
 Russian
 -
 Samoan
 -
 Scottish Gaelic
 -
 Serbian
 -
 Sesotho
 -
 Shona
Shona -
 Sindhi
 -
 Sinhala
 -
 Slovak
 -
 Slovenian
 -
 Somali
 -
 Spanish
 -
 Sundanese
 -
 Swahili
 -
 Swedish
 -
 Tagalog
 -
 Tajik
Tajik -
 Tamil
Tamil -
 Tatar
Tatar -
 Telugu
 -
 Thai
Thai -
 Turkish
 -
 Turkmen
 -
 Ukrainian
 -
 Urdu
Urdu -
 Uighur
 -
 Uzbek
Uzbek -
 Vietnamese
 -
 Welsh
Welsh -
 Bantu
Bantu -
 Yiddish
 -
 Yoruba
 -
 Zulu
Zulu


जानेवारी . 20, 2025 00:55
Back to list
changing upper control arm
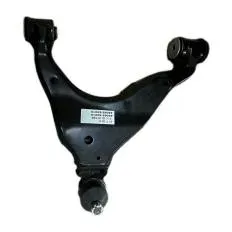
Changing an upper control arm is a crucial maintenance task that many vehicle owners encounter at some point in the lifespan of their automobiles. This task might seem daunting at first, but with a clear understanding of the process and the right tools, it becomes substantially more manageable.
With the old control arm removed, inspect the surrounding components for any signs of wear or damage. Often, ball joints and bushings might also need replacing. Ignoring these additional components can lead to more significant problems down the line, impacting the vehicle’s performance and safety. Installing the new upper control arm is essentially the reversal of the removal process. Align it correctly and attach it to the mounting points, securing it with the appropriate fasteners. Precision here is crucial to maintaining the manufacturer's specifications and ensuring the vehicle's alignment remains intact. Reinstall the wheel and cautiously lower the vehicle once all components are firmly in place. Post-replacement, it's prudent to have your vehicle’s alignment checked by a professional. A proper alignment ensures that your vehicle handles optimally and that tire wear remains even. This step, while sometimes overlooked, is an integral part of the process, ensuring safety and extending the life of your vehicle's tires. For enthusiasts and novices alike, joining automotive forums or communities online can provide additional insights and support. Sharing experiences, challenges, and solutions contributes to collective knowledge and further enhances one's understanding of automotive repairs. These communities often have experts who can offer advice and suggestions based on firsthand experience, promoting credibility and trustworthiness. Changing an upper control arm, when done with diligence and care, not only improves vehicle safety but also enhances ride quality. Investing time in understanding the mechanics and the importance of each component ensures that the job is done correctly, saving time and money in the long run.

With the old control arm removed, inspect the surrounding components for any signs of wear or damage. Often, ball joints and bushings might also need replacing. Ignoring these additional components can lead to more significant problems down the line, impacting the vehicle’s performance and safety. Installing the new upper control arm is essentially the reversal of the removal process. Align it correctly and attach it to the mounting points, securing it with the appropriate fasteners. Precision here is crucial to maintaining the manufacturer's specifications and ensuring the vehicle's alignment remains intact. Reinstall the wheel and cautiously lower the vehicle once all components are firmly in place. Post-replacement, it's prudent to have your vehicle’s alignment checked by a professional. A proper alignment ensures that your vehicle handles optimally and that tire wear remains even. This step, while sometimes overlooked, is an integral part of the process, ensuring safety and extending the life of your vehicle's tires. For enthusiasts and novices alike, joining automotive forums or communities online can provide additional insights and support. Sharing experiences, challenges, and solutions contributes to collective knowledge and further enhances one's understanding of automotive repairs. These communities often have experts who can offer advice and suggestions based on firsthand experience, promoting credibility and trustworthiness. Changing an upper control arm, when done with diligence and care, not only improves vehicle safety but also enhances ride quality. Investing time in understanding the mechanics and the importance of each component ensures that the job is done correctly, saving time and money in the long run.
Next:
Latest news
Understanding the Role and Importance of Control Arms in Vehicle Suspension
NewsMar.13,2025
Understanding the Importance of Front Lower Control Arms in Your Vehicle
NewsMar.13,2025
Understanding the Costs of Control Arm Repairs and Replacements
NewsMar.13,2025
Finding the Right Car Control Arm Suppliers for Your Vehicle Needs
NewsMar.13,2025
Choosing the Right Upper Control Arms for Your Lifted Truck
NewsMar.13,2025
Choosing the Right Control Arm for Your Vehicle
NewsMar.13,2025
-

 English
 Afrikaans
 Albanian
 Amharic
 Arabic
 Armenian
 Azerbaijani
 Basque
 Belarusian
 Bengali
 Bosnian
 Bulgarian
 Catalan
 Cebuano
 Corsican
 Croatian
 Czech
Czech
 Danish
 Dutch
Dutch
 Esperanto
 Estonian
 Finnish
 French
 Frisian
 Galician
 Georgian
 German
 Greek
Greek
 Gujarati
 Haitian Creole
 Hausa
Hausa
 Hawaiian
 Hebrew
 Hindi
Hindi
 Miao
Miao
 Hungarian
 Icelandic
 Igbo
Igbo
 Indonesian
 Irish
Irish
 Italian
 Japanese
 Javanese
 Kannada
 Kazakh
 Khmer
Khmer
 Rwandese
 Korean
 Kurdish
 Kyrgyz
 Lao
Lao
 Latin
Latin
 Latvian
 Lithuanian
 Luxembourgish
 Macedonian
 Malgashi
 Malay
Malay
 Malayalam
 Maltese
 Maori
Maori
 Mongolian
 Myanmar
 Nepali
 Norwegian
 Norwegian
 Occitan
 Pashto
 Persian
 Polish
 Portuguese
 Punjabi
 Romanian
 Russian
 Samoan
 Scottish Gaelic
 Serbian
 Sesotho
 Shona
Shona
 Sindhi
 Sinhala
 Slovak
 Slovenian
 Somali
 Spanish
 Sundanese
 Swahili
 Swedish
 Tagalog
 Tajik
Tajik
 Tamil
Tamil
 Tatar
Tatar
 Telugu
 Thai
Thai
 Turkish
 Turkmen
 Ukrainian
 Urdu
Urdu
 Uighur
 Uzbek
Uzbek
 Vietnamese
 Welsh
Welsh
 Bantu
Bantu
 Yiddish
 Yoruba
 Zulu
Zulu
 Marathi


