-
 Afrikaans
 -
 Albanian
 -
 Amharic
 -
 Arabic
 -
 Armenian
 -
 Azerbaijani
 -
 Basque
 -
 Belarusian
 -
 Bengali
 -
 Bosnian
 -
 Bulgarian
 -
 Catalan
 -
 Cebuano
 -
 Corsican
 -
 Croatian
 -
 Czech
Czech -
 Danish
 -
 Dutch
Dutch -
 English
 -
 Esperanto
 -
 Estonian
 -
 Finnish
 -
 French
 -
 Frisian
 -
 Galician
 -
 Georgian
 -
 German
 -
 Greek
Greek -
 Gujarati
 -
 Haitian Creole
 -
 hausa
hausa -
 hawaiian
 -
 Hebrew
 -
 Hindi
Hindi -
 Miao
Miao -
 Hungarian
 -
 Icelandic
 -
 igbo
igbo -
 Indonesian
 -
 irish
irish -
 Italian
 -
 Japanese
 -
 Javanese
 -
 Kannada
 -
 kazakh
 -
 Khmer
Khmer -
 Rwandese
 -
 Korean
 -
 Kurdish
 -
 Kyrgyz
 -
 Lao
Lao -
 Latin
Latin -
 Latvian
 -
 Lithuanian
 -
 Luxembourgish
 -
 Macedonian
 -
 Malgashi
 -
 Malay
Malay -
 Malayalam
 -
 Maltese
 -
 Maori
Maori -
 Marathi
 -
 Mongolian
 -
 Myanmar
 -
 Nepali
 -
 Norwegian
 -
 Norwegian
 -
 Occitan
 -
 Pashto
 -
 Persian
 -
 Polish
 -
 Portuguese
 -
 Punjabi
 -
 Romanian
 -
 Russian
 -
 Samoan
 -
 Scottish Gaelic
 -
 Serbian
 -
 Sesotho
 -
 Shona
Shona -
 Sindhi
 -
 Sinhala
 -
 Slovak
 -
 Slovenian
 -
 Somali
 -
 Spanish
 -
 Sundanese
 -
 Swahili
 -
 Swedish
 -
 Tagalog
 -
 Tajik
Tajik -
 Tamil
Tamil -
 Tatar
Tatar -
 Telugu
 -
 Thai
Thai -
 Turkish
 -
 Turkmen
 -
 Ukrainian
 -
 Urdu
Urdu -
 Uighur
 -
 Uzbek
Uzbek -
 Vietnamese
 -
 Welsh
Welsh -
 Bantu
Bantu -
 Yiddish
 -
 Yoruba
 -
 Zulu
Zulu
replacing lower control arm
Replacing the Lower Control Arm A Comprehensive Guide
The lower control arm is a vital component of a vehicle's suspension system, playing a crucial role in maintaining proper wheel alignment and ensuring a smooth ride. Over time, wear and tear can lead to issues that may affect the vehicle's handling and safety. If you notice symptoms like uneven tire wear, knocking noises when driving over bumps, or a misaligned steering wheel, it might be time to consider replacing the lower control arm.
Understanding the Lower Control Arm
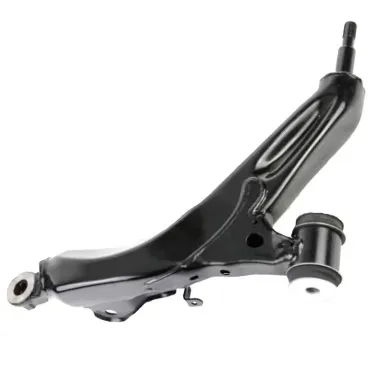
The lower control arm connects the vehicle's chassis to the wheel assembly. It allows for vertical movement of the wheels while supporting the weight of the vehicle and maintaining proper alignment. Typically constructed from durable metals, lower control arms can last for many years; however, they can become damaged due to rough driving conditions, accidents, or exposure to road salt.
Signs of a Failing Lower Control Arm
Before you jump into replacement, it’s essential to recognize the signs that indicate your lower control arm may need attention
1. Clunking Noises A loud clunk or knock from the suspension when driving over bumps could suggest that the control arm bushings are worn out. 2. Uneven Tire Wear If you notice uneven wear patterns on your tires, it may be due to improper alignment resulting from a failing lower control arm. 3. Vibration Unexplained vibrations while driving can indicate that the control arm is damaged or the bushings have worn out. 4. Steering Issues If the steering feels loose or is unresponsive, it could be due to a compromised lower control arm.
The Replacement Process
Replacing a lower control arm is a task that many DIY enthusiasts can handle with the right tools and knowledge
. Here’s a step-by-step guide to help you through the processreplacing lower control arm

1. Gather Necessary Tools and Parts You will need a jack, jack stands, wrenches, a torque wrench, and replacement parts specific to your vehicle model.
2. Lift the Vehicle Use the jack to raise the vehicle and secure it with jack stands. Ensure it's stable before working underneath.
3. Remove Wheel Take off the wheel to access the suspension components.
4. Detach the Lower Control Arm Remove the bolts securing the control arm to the chassis and the wheel hub. If it’s rusted or stuck, some penetrating oil may help loosen it.
5. Install the New Control Arm Position the new control arm in place and secure it with the bolts. Ensure to follow the manufacturer’s torque specifications for a secure fit.
6. Reassemble Everything Reattach the wheel, lower the vehicle, and ensure everything is properly tightened.
7. Alignment Check After replacing the control arm, it’s crucial to get your vehicle’s alignment checked to ensure proper handling and tire wear.
Conclusion
Replacing a lower control arm can seem daunting, but with the right tools and knowledge, it can be a manageable job for many car owners. Regular maintenance and prompt replacement of worn components not only enhance your vehicle's performance but also contribute to your safety on the road. If you are ever in doubt, consult a professional mechanic to ensure the job is done correctly and safely.


