-
 Afrikaans
 -
 Albanian
 -
 Amharic
 -
 Arabic
 -
 Armenian
 -
 Azerbaijani
 -
 Basque
 -
 Belarusian
 -
 Bengali
 -
 Bosnian
 -
 Bulgarian
 -
 Catalan
 -
 Cebuano
 -
 Corsican
 -
 Croatian
 -
 Czech
Czech -
 Danish
 -
 Dutch
Dutch -
 English
 -
 Esperanto
 -
 Estonian
 -
 Finnish
 -
 French
 -
 Frisian
 -
 Galician
 -
 Georgian
 -
 German
 -
 Greek
Greek -
 Gujarati
 -
 Haitian Creole
 -
 hausa
hausa -
 hawaiian
 -
 Hebrew
 -
 Hindi
Hindi -
 Miao
Miao -
 Hungarian
 -
 Icelandic
 -
 igbo
igbo -
 Indonesian
 -
 irish
irish -
 Italian
 -
 Japanese
 -
 Javanese
 -
 Kannada
 -
 kazakh
 -
 Khmer
Khmer -
 Rwandese
 -
 Korean
 -
 Kurdish
 -
 Kyrgyz
 -
 Lao
Lao -
 Latin
Latin -
 Latvian
 -
 Lithuanian
 -
 Luxembourgish
 -
 Macedonian
 -
 Malgashi
 -
 Malay
Malay -
 Malayalam
 -
 Maltese
 -
 Maori
Maori -
 Marathi
 -
 Mongolian
 -
 Myanmar
 -
 Nepali
 -
 Norwegian
 -
 Norwegian
 -
 Occitan
 -
 Pashto
 -
 Persian
 -
 Polish
 -
 Portuguese
 -
 Punjabi
 -
 Romanian
 -
 Russian
 -
 Samoan
 -
 Scottish Gaelic
 -
 Serbian
 -
 Sesotho
 -
 Shona
Shona -
 Sindhi
 -
 Sinhala
 -
 Slovak
 -
 Slovenian
 -
 Somali
 -
 Spanish
 -
 Sundanese
 -
 Swahili
 -
 Swedish
 -
 Tagalog
 -
 Tajik
Tajik -
 Tamil
Tamil -
 Tatar
Tatar -
 Telugu
 -
 Thai
Thai -
 Turkish
 -
 Turkmen
 -
 Ukrainian
 -
 Urdu
Urdu -
 Uighur
 -
 Uzbek
Uzbek -
 Vietnamese
 -
 Welsh
Welsh -
 Bantu
Bantu -
 Yiddish
 -
 Yoruba
 -
 Zulu
Zulu
Jan . 20, 2025 02:03
Back to list
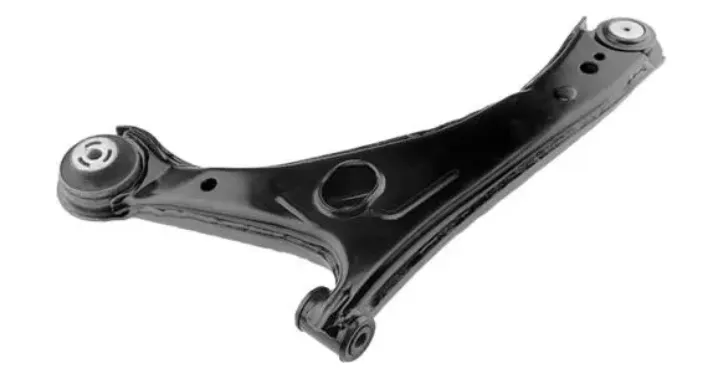
front driver side lower control arm
Replacing the lower control arm in a vehicle is a critical process that involves a blend of mechanical expertise, precise execution, and a sound understanding of the car's anatomy. Engaging in this task requires not only the right tools but also a commitment to safety and accuracy. This article provides an in-depth look into the steps and considerations essential in the seamless replacement of a lower control arm, offering insights that ensure safety and efficiency.
The actual removal process involves detaching the control arm from the suspension components and the vehicle frame. Typically, this will require removal of bolts and bushings. Remember to keep track of the parts, arranging them in the order of removal, to facilitate an easier reassembly. Caution is imperative as tension from the suspension springs can pose a hazard. Upon removal of the old control arm, compare it with the new one to confirm compatibility. This is your opportunity to correct any discrepancies before installation. The re-installation should follow the reverse process of removal. Make it a point to torque bolts to the manufacturer's specifications, as this will ensure safety and proper functionality of the suspension system. Once the lower control arm is securely in place and all bolts are appropriately tightened, a crucial step follows alignment. Any alterations to suspension components inevitably affect wheel alignment. Failure to properly align the wheels afterwards can result in uneven tire wear and poor handling. It is recommended to have a professional alignment performed if you're not equipped to handle it personally. Replacing a lower control arm is not merely about mechanical skill; it's about understanding the vehicular dynamics and ensuring that every aspect of replacement aligns with safety and optimal performance. By following the outlined steps with diligence, one can transform a potentially stressful procedure into a rewarding accomplishment. Remember, when in doubt, consulting with a seasoned mechanic can provide guidance and further enhance the trustworthiness of the task at hand. Each step taken with care not only extends the life of the vehicle but also ensures safety for all occupants, blending experience with the authority that comes from a job meticulously done.


The actual removal process involves detaching the control arm from the suspension components and the vehicle frame. Typically, this will require removal of bolts and bushings. Remember to keep track of the parts, arranging them in the order of removal, to facilitate an easier reassembly. Caution is imperative as tension from the suspension springs can pose a hazard. Upon removal of the old control arm, compare it with the new one to confirm compatibility. This is your opportunity to correct any discrepancies before installation. The re-installation should follow the reverse process of removal. Make it a point to torque bolts to the manufacturer's specifications, as this will ensure safety and proper functionality of the suspension system. Once the lower control arm is securely in place and all bolts are appropriately tightened, a crucial step follows alignment. Any alterations to suspension components inevitably affect wheel alignment. Failure to properly align the wheels afterwards can result in uneven tire wear and poor handling. It is recommended to have a professional alignment performed if you're not equipped to handle it personally. Replacing a lower control arm is not merely about mechanical skill; it's about understanding the vehicular dynamics and ensuring that every aspect of replacement aligns with safety and optimal performance. By following the outlined steps with diligence, one can transform a potentially stressful procedure into a rewarding accomplishment. Remember, when in doubt, consulting with a seasoned mechanic can provide guidance and further enhance the trustworthiness of the task at hand. Each step taken with care not only extends the life of the vehicle but also ensures safety for all occupants, blending experience with the authority that comes from a job meticulously done.
Latest news
front-lower-control-arm-that-key-to-mitsubishi-lancer-or-outlander-suspension
NewsAug.22,2025
a-arm-car-components-that-premium-suspension-for-hyundai-santa-fe
NewsAug.22,2025
extended-control-arms-that-elevating-vehicle-suspension-performance
NewsAug.22,2025
essential-tools-for-driver-side-control-arm-replacement-procedures
NewsAug.22,2025
comprehensive-analysis-of-front-control-arm-and-front-upper-control-arm-technologies
NewsAug.22,2025
control-arm-that-reliable-automotive-components-by-hebei-lingke
NewsAug.22,2025


